Box Modeling Technique: How to Get a Perfect 3D Model
What is Box Modeling
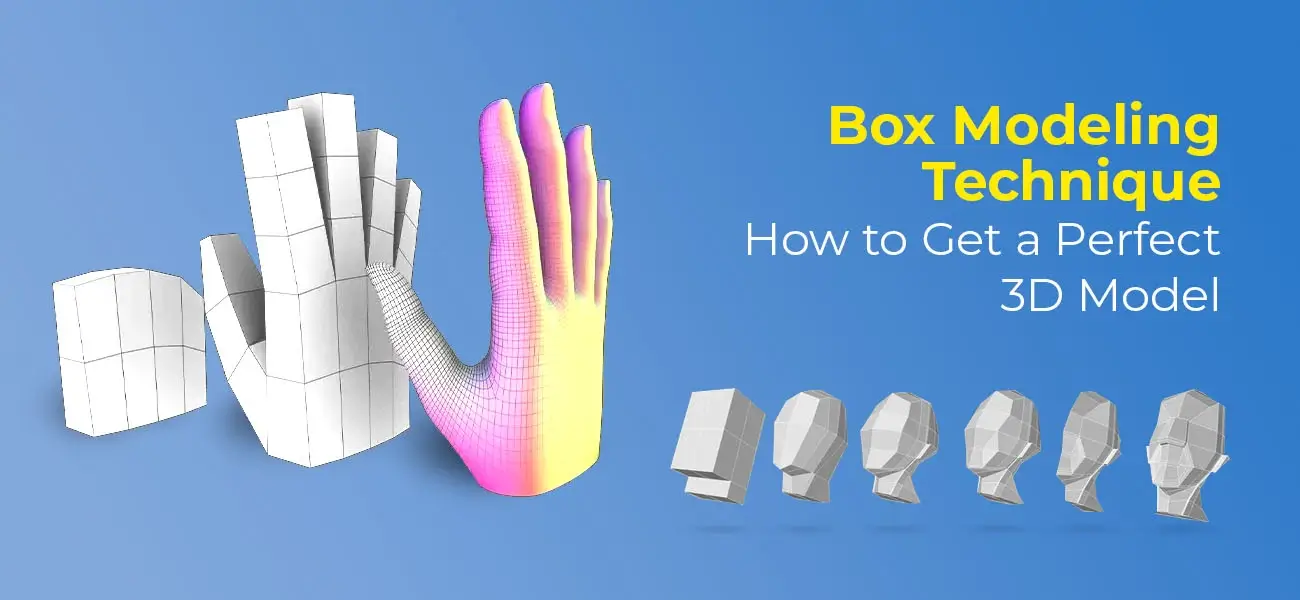
It is one of the 3D modeling techniques in which a primitive shape is utilized to develop the basic shapes of 3D model. This can be further used to sculpt out the final prototype of the object. It is rendered versatile by various techniques, among which box modeling is a prominent one.
3D modelling technology has limitless potential when it comes to designing. In this 3D modeling process, the surface of any object is represented mathematically in three dimensions with the help of specialized software.
With box modeling techniques, the final model is sculpted gradually in 3D design software from a fundamental and native shape such as a box, cylinder or other primitive objects.
Through various iterative steps and cutting-edge tools, the primitive shapes are modeled from scratch. The amount of detailing and intricacies that you want to incorporate in the shape can be controlled.
Various Steps in Box Modeling
In box modeling, you need to commonly adhere to some steps for receiving impeccable results.
Setting up the Work Environment
First, you need to search for relevant and attractive reference materials that can be applied to the desired things to model in 3D. Then, you need to set up multiple views or angles of the model and prepare a plan about how you are going to proceed.
Now, map the level of detail required and the steps involved in achieving the same. Finally, you can try working out the method that would allow faster and easier implementation of box modeling.
After setting the work environment optimally, place the reference image in the background. Setting up all the shortcuts and layout related expedients, choose a basic shape in the 3D software which would lead to the faster completion of the draft.
Defining the Rough Draft
Try defining the rough draft by making customized segments or iterations to the basic shape.
In Maya, the segments can be found in the Channel Box for effective use of maya box modeling method.
In 3DS Max, the iterations can be created from the Command Panel or on the Create/ Modify panel.
Finally, you can nowstart adding details to the rough draft. With the help of the Connect Command, extrude the desired faces and use other tools to finalize the basic draft of the model. The objective should be to arrive at a workable outline or shape silhouette.
The model in the outline formmight appear like a mass of roughly connected basic shapes. You can either extrude the face in a positive or negative manner for evenly extending the area.
With Insert Face, you can develop a face that is evenly formed into another for the ease of extruding in or out. This would provide more symmetry to the shape’s geometry.
In 3DS Max, the edge can be added with the ‘Connect Vertices’ command. It also allows for defining or controlling any four-sided polygon’s tessellation.The ‘Connect Edges’ command in 3DS Max allows for combining the shape with Loop and Ring.
Even geometry can be added using this command in a hassle-free manner. For a streamlined flow, you can merge the edges and clean redundant geometry with the 3DS max command ‘Target Weld Vertices’. In case you want to eliminate the redundant geometric shapes, you can use the‘Remove Edge or Vertices’ command.
For maintaining the integrity of geometry, you can initially start by removing the edges and then gradually removing the edges connected to the isolated vertices. With the ‘Cut edge’ command, you can swiftly and efficiently adjust the edges.
However, make sure to be careful while using the command as its improper use can lead to clumsy geometry or newer, unwanted additions. The gaps which had surfaced after deletion of certain faces can be filled with ‘Create face’ command.
For ensuring that the viewable portion of the model is edited, the face must be created clockwise. Once the aforesaid common modeling techniques have been executed, you can start adding more details to the model for redefining it.You can round the edges, introduce further geometry, clean up or remove geometry, and create edge loops.
Rough Detail Stage
The rough model achieved so far can be refined by repeating the above steps. Apart from that, below are some other tools that are commonly used at this stage.
- Gaps created due to face deletion can be filled with ‘Create Face’. Try using the command on faces in the clockwise mode to target the visible faces.
- Edges can be rounded off or two edges can be formed out of one with the ‘Chamfer Edge’.
- If the model form is set and some vertices or edge have to be moved little, the same can be done with 3DS Max modeling techniques by using Constraints tool.
- The path along which the edge of the face or vertex has to be moved can be defined using constraints.
- The face which has been oriented wrongly can be corrected using Flip Face or Normal command
Clean-up stage
In the final detailing stage or the clean-up stage, the model needs to be smoothed out effectively by repeating the aforesaid commands. Subtle detailing such as fabric folds can be added as per the requirement. This would significantly improve the geometric flow and help in achieving sharper edges.
The model silhouette has to be worked upon from all possible directions. This eliminates the potential of having untreated edges or vertices which can ruin the appearance of the final model.
The geometry that is needed for animating the model can be added over here. If texturing the geometry becomes a tough task, you can reduce the texture by pinching optimally.
Now, you need to rectifythe silhouette related problems. Cross check each face’s geometry for any abnormality and fix the same. A quick rig can be set up if the character for a game or so is being modeled.
The geometry of the character can be deformed based on its proposed movements. Look out for areas that are running the appearance of the model in the deformed state. Make sure to correct all the clumsy deformations in the geometry.
The hip region or the shoulders of the character might have maximum deformations. So, ensure that every aspect of the model is finished adequately using the polygonal modeling techniquesdiscussed above. All individual box shapes should be symmetrically joined to one finalized object.
3D modeling is a time intensive and critical task wherein precise attention has to be provided even to minute details. You may have acquired a fair idea of box modeling procedures by now. The model can be fine-tuned further until the perfect look is accomplished. You can also hire the 3D modeling experts for quicker and professional looking models.
Contact Us
Other Modeling Techniques You Might Interested to Know
- Contour/Edge modeling
- Spline/NURBS modeling
- Sub-division modeling
- Digital sculpting
- 3D wireframe modeling